Wooden Boat Plans Australia
Tomorrow morning, before I take off for work, Im going to spend an hour or two so I can clean and organize the shop now that the metal work is completed. Im ready to prep the super structure for paint so I need to put away all the tools Ive been using to do battle.
.jpg)
.jpg)
.jpg) Im a little blown away with how long it took to get the metal work completed. I did have a major set back in that the rough openings for the windows were cut for a four inch radius, and the windows are built using a six inch radius. There are 17 windows in the super structure and the repair consisted of me using my plasma cutter to cut out the 68 corners out of the existing rough openings. I then cut 68 new radius corners and welded them back in to the openings. The windows in the salon were easy as they were all square. The windows in the pilot house were a bit more of a challenges as they are all parallelograms, and required a little bit of noggin work to get the angles along with the radiuss correct. But, the window openings are now correct and all the widows fit the way theyre supposed to. Along with repairing the window openings, I added 60 or 70 more tabs to the window openings to bolt framing lumber to.
Im a little blown away with how long it took to get the metal work completed. I did have a major set back in that the rough openings for the windows were cut for a four inch radius, and the windows are built using a six inch radius. There are 17 windows in the super structure and the repair consisted of me using my plasma cutter to cut out the 68 corners out of the existing rough openings. I then cut 68 new radius corners and welded them back in to the openings. The windows in the salon were easy as they were all square. The windows in the pilot house were a bit more of a challenges as they are all parallelograms, and required a little bit of noggin work to get the angles along with the radiuss correct. But, the window openings are now correct and all the widows fit the way theyre supposed to. Along with repairing the window openings, I added 60 or 70 more tabs to the window openings to bolt framing lumber to. The other job I did was increase the width of the door at the salon to 32". Ill be fabricating the aluminum door, so I feel OK with the increased size. I plan on having at least two dogs in the door to help hold it fast. Along with being weather tight, I want a door that will keep the thieves out.
Im using composting toilets on board and each one of those requires an 1.5" vent. I made those vents out of sch. 40 stainless. One is welded in to the soffit above the salon, and the below deck vent is welded in to the front of the wheel house. Ill use PVC to connect the toilets to the stainless stubs I welded in the hull.
 We have a shower for the cabins below deck, but due to the size of my posse, I felt it best if we had another shower on board. The easiest place to do this was on the aft deck in the port side corner of deck on the salon bulkhead. This will be a hot/cold shower. I fabricated a stainless shelf with a lip on it to retain soap, and a bar for wash rags and to hold back shampoo bottles.
 I installed a 4" stainless vent for our 230volt clothes dryer.
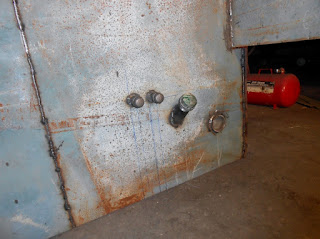.jpg) On the aft salon bulkhead on the aft deck the fuel fills and vents reside. There is a two inch fill on both the port and starboard side. Next to each fill are the vents for the two port side tanks and two starboard tanks. The fill and vent pipes are welded in place. I really need a box around each set of pipes, similar to what Peter did on Koala ( now Kame Hele... not sure of the spelling). I have a little bit of time left where I can fabricated these boxs, and I might try braking them over the work bench. If not, my neighbor will do it on his press brake.
On the aft salon bulkhead on the aft deck the fuel fills and vents reside. There is a two inch fill on both the port and starboard side. Next to each fill are the vents for the two port side tanks and two starboard tanks. The fill and vent pipes are welded in place. I really need a box around each set of pipes, similar to what Peter did on Koala ( now Kame Hele... not sure of the spelling). I have a little bit of time left where I can fabricated these boxs, and I might try braking them over the work bench. If not, my neighbor will do it on his press brake. Outboard of the fill and vents are the two three inch vents for the lazzarette. These are weld in place.
.jpg) I welded the six inch vent intakes for the master cabin. These vents are in the foreword wall of the wheel house.
I welded the six inch vent intakes for the master cabin. These vents are in the foreword wall of the wheel house.To get up on the the roof of the salon, Im going to gain access via the wheel house side deck. Because of the raised pilot house, a five foot tall ladder is all that is needed to get on to the roof. I fabricated and welded some brackets to the salon wall to pin the removable ladder to. Its hard to describe it now, but because of the bulwark, and how I plan on working the salon roof hand rail, this will be a safe, secure way to get up on to the roof.
 I was going to get fancy and use a torsion spring to have the ladder self stow up on the roof, but my short time frame killed that idea and I decide to stow the ladder on stainless post welded to the front of the wheel house. The forward rake of the wheel house windows along with the almost 5 distance to the Portuguese bridge will allow all to pass by this area without bumping the ladder. It will make more sense once the super structure is welded to the hull.
Because I moved the aft salon wall, I had to cut the panel that extends down the salon line towards the aft deck. One of the boarding doors conflicts with this panel, so I cut it to fit. I gave this cut a nice looking radius where it meets the aft deck roof. It was important to me to keep some protection of the aft salon wall at this area, so we still have an inside corner where I cut the panel to accommodate the boarding door. Because both the port and starboard side panel are 3/16 material, I decided to treat each edge with a 1/2" stainless round bar. The round bar treatment should come in handy on the side where the boarding door is as this area will get some abuse. Hopefully, the stainless round bar helps with decreasing my maintenance painting. Every exposed, exterior edge on board, has a 1/2" stainless round bar welded to it.

I used 70 lbs of .035 welding wire to build the super structure. Im not for sure, but I think I drilled darn near 500 5/16 holes for bolting framing lumber to the steel frames. I might have drilled more holes, but Im going to order 500 2"x1/4" carriage bolts, nylock nuts and washers and see how that works out.
As of today, my paint schedule is going to be blast the metal followed by two coats of epoxy primer. The inside of the super structure will get two more coats of Alkyd Enamel, then the framing lumber gets bolted on followed by spray foam. The roof of the super structure will get blasted followed by two coats of epoxy primer then three or four coats of Acrylic Urethane. Ill probably put a non skid on the roof, but that wont happen until after launch. The outside of the super structure will get blasted, two coats of primer, two coats of high build primer, fair ed, more primer to seal the high build, then top coat with three or four coats of Acrylic Urethane.
The last job I did to get the super structure ready to begin paint prep was to have my daughter and her friend Olivia walk around on the roof so I could fix the six or seven areas that were "oil canning". All that was required of that job was to find the offending areas, then weld a 1.5" flat bar between the longs and pull the roof sheathing down and weld it to the flat bar. Pretty easy job, but it still took us about three hours to wrap it up.
As anyone can imagine, Im glad to have this part of the job behind me. Paint and paint prep is going to be nasty, but I can now see the bitter end. Maybe by early October, Ill be able to post some sort of smiley face as I should be starting to take the front of the barn off.

Do you find information about Wooden Boat Plans Australia are you looking for? If not, below may help you find more information about the Wooden Boat Plans Australia. Thank you for visiting, have a great day.

 Getting all the little odds and ends completed before I can paint the super structure is taking quite a bit more time than I had anticipated. Im trying to work out a few problems as once I start paint prep, I dont want to stop to do some welding. Once the boat is at the launch site, I have a feeling Ill be doing some welding I forgot on the super structure, but my hope is that I get it all figured out now.
  Once I had all the cleats welded in place I turned my focus to the welding needed to be done on the super structure roof. The roof work has turned out to taking a little more time than I had thought it would. I am planning for using a LP fired stove in the galley, and I needed a place to store propane. I framed a propane locker on the roof that will be large enough to store two bottles. Even though Im not going to be doing any fairing work on the roof, I used pipe to make the corners of the propane locker. The pipe corners will paint up nicely, and will require little fairing to make them look good and cut down on future maintenance. The locker has two drains to let wasps in and water and any propane that could spring a leak out. I welded a 1/2" stainless nipple in the bottom of the locker to allow me to plumb the propane supply line in to the galley. The lid for the propane locker will be a simple lid with two pins for hinges and a simple latch.
 In the center of the super structure sits the exhaust stack funnel. Im using a keel cooled main engine and a dry exhaust system. The exhaust system is basically like a truck, and uses a pipe to bring the exhaust up and out of the boat. Along with the exhaust from the engine, Im using the exhaust funnel to vent the hot air out of the engine room. I also am using the exhaust funnel to bring cool air in to the engine room. In order to do this, I partitioned the exhaust funnel in half, with one half dedicated to getting hot air and exhaust out of the engine room, and the other half for bringing cool intake air into the engine room. The largest hole I could cut in to the exhaust funnel at what I would consider an elevation where the hole would actually do something was 12"x16". So I have a 12"x16" hole for the intake, and the same for the hot air exhaust. I purchased a cheap coil stock louver from Lowes to see how it would work out, and Im going to buy some better quality louvers for the final install. Ill probably use the cheap louvers over the winter just to keep the weather out. Removing the louvers is also how Ill gain access to clamping the exhaust pipe to the 4" stainless pipe I welded in to the exhaust funnel top.
 I like the way the exhaust funnel looks and in order to keep things looking good I had the metal formed on a press brake. The fab shop owners is one of my neighbors and it was fun helping him do this small job for me. The exhaust funnel is tapered so there are two different radiuss on the piece. In order to get the different radiuss Mark set the machine to hit harder on one side than it did on the other. His machine is a Cincinnati 300 ton press brake, and was built in 1942. Cincinnati is a good brand, and this machine was built in a era in this country that has faded fast. We need our manufacturing jobs. Mark laid the pieces out for 20 hits per piece, and in this picture, you can see him lining the die up to hit on his punch marks.
  The salon roof is where well be storing our skiff, bikes, and kayaks. Because of having to work up there, I decide to install a hand rail around the salon roof. Im not ready to install the hand rail, and really dont want to do that job just yet, so I decided to cut some 1.5" discs to act as a doubler for welding the 1" handrail stanchions to. By using the doubler discs, all Ill have to do is sand the paint off the disc and weld the stanchion to the disc. The disc will act as a heat sink and not burn the paint from the outside or inside of the roof. Ill be TIG welding ( Norm F. @ Kevin M ) the hand rail together, so splatter will not be an issue. I cut the disc on my mill using a hole saw and cooling the bit with water.
 The disc will also look decent with the hand rail stanchion, will not look like an afterthought, and allows me to keep things moving as doing this work is a hell of a lot easier with the hand rail not installed. As per my locating the hand rail stanchions over a frame, I have kept in line with over building everything. The hand rail stanchions ended up being 30" on center.
  A 12 long skiff will fit nicely, but a 13 would also fit albeit tight. Im going to build the skiff in aluminum, but that wont be for another two years. Getting a little off subject, I sure would like to weld part of the cradle to act as a fuel tank for storing gasoline for the skiff. Again, the doubler plates will allow me to build the cradle later without destroying the paint outside or inside under the finished ceiling. The plans Im looking at for a skiff is 12 long, 5 beam, powered by 20 hp, and can carry 1000 lbs. It will weight about 300 lbs when completed.

